
How to Build a DIY Pond: Step-by-Step Backyard & Garden Guide
By Hydro Experts | 30 June 2025
Are you looking to turn a quiet corner of your backyard into a peaceful, relaxing escape? A DIY pond is the perfect way to bring nature closer to home. Whether you're looking to grow water plants or simply enjoy the soothing sound of water, building your own pond is easier than you might think.
With a bit of planning, a few simple tools, and some creativity, you can create a beautiful pond that adds charm and calm to your garden, without hiring a professional.
Careful Planning For Your Pond
Planning your pond is the first and most important step. With a proper plan in place even before starting, it will help you to avoid common mistakes and make the whole process smoother and more enjoyable. Therefore, here are some key things you need to think about before you start digging.

1. Choosing the Perfect Pond Location
The spot you choose for your pond is one of the most important decisions you'll make. For this, you'll need to do more thinking about different factors, such as how much sun the area gets. Most pond plants are comfortable around little sun, but too much intense sun all day can cause a lot of algae to grow, making your water look green. Therefore, aim for a spot that gets about 4 to 6 hours of direct sunlight each day.
Also, consider any nearby trees. While trees offer nice shade, their falling leaves can quickly fill your pond, break down, and create a messy sludge. Tree roots can also grow over time and potentially push against or even puncture your pond liner. Additionally, think about convenience and choose a spot where you can see and reach the pond easily.
2. Determining Pond Size and Depth
How big do you want your pond to be? This depends a lot on the space you have available in your yard. Even small "mini ponds" can add a lot of charm and a touch of nature to a cozy corner. Think about the overall look you want to achieve and how the pond will fit with your existing garden.
Next, consider the main purpose of your pond. If you only want to grow beautiful aquatic plants like water lilies, a shallower pond might be fine. However, if you dream of having pond fish like goldfish or Koi, your pond will need to be deeper. If you want to play it safe, you can build a standard-sized pond in Australia, which is 10' x 15' (3m x 4.6m) with a depth of 2 feet (60cm).
3. Pond Styles and Design Ideas
With you building your pond, you have complete flexibility in your hands. This means you can build your pond in any shape and size, allowing you to match your garden's style. You might choose a naturalistic pond, which has an irregular, organic shape that blends seamlessly with the surrounding landscape, often using lots of rocks. Or, you might prefer a formal pond, which usually has straight lines, perfect circles, or squares, giving it a more manicured and tidy appearance.
When it comes to construction, you have a couple of main options. Pre-formed ponds are rigid, ready-made plastic shells that you simply dig a hole to fit. They are generally easier and quicker to install, especially for smaller ponds. Alternatively, pond liner ponds use a flexible sheet of material that you can shape into any custom design you desire, offering maximum creativity.
4. Budgeting for Your DIY Pond Project
Before you buy anything, it's a good idea to set a budget for your DIY pond project. The biggest part of your cost will usually be the materials. This includes the pond liner, the pump, the filter, and all the rocks and gravel you'll need. Prices can vary quite a bit depending on the size of your pond and the quality of the materials you choose.
Think about the tools you'll need as well. You might already own basic gardening tools like shovels and a wheelbarrow. However, for larger projects, you might consider renting equipment like a small excavator, which can make digging much faster, though this will add to your overall cost.
Supplies Required to Build a Pond
Now that you have a clear plan for your pond, it's time to gather all the necessary items. Having all your pond supplies ready before you start digging will make the process much smoother and keep your project on track.
Here is the list of supplies you'll likely require to build a pond:
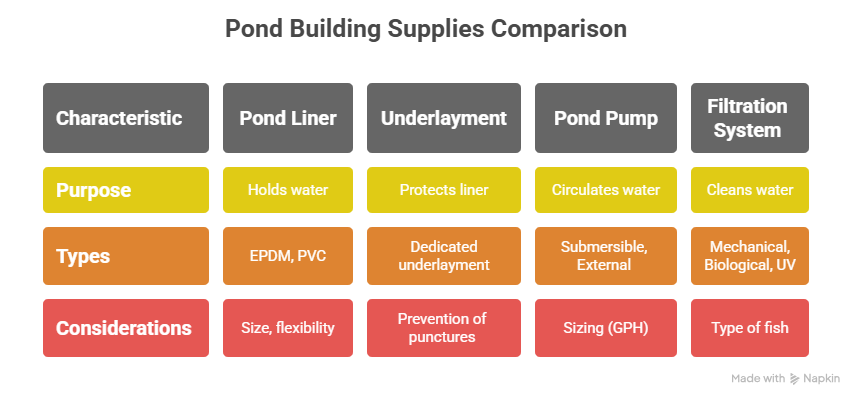
1. Pond Liner
This is arguably the most important item you'll buy, as it holds all the water in your pond! A good liner is tough and flexible, so it won't leak. Despite there being numerous options out in the current market, here are some of the best ones you can try:
- EPDM Pond Liner: This is the most popular choice for DIY pond construction. It's a thick, flexible rubber material that's very strong and lasts for many, many years. It's great for shaping into any pond design you can imagine.
- PVC Pond Liner: This is a more budget-friendly option. While it's cheaper, it might not be as flexible or last as long as the EPDM liner, but it can get the job done.
Additionally, try to figure out how big a liner you need. For this first measure, the longest and widest points of your pond design. Then, add twice the deepest depth to each of those measurements, and finally, add an extra 2 feet for overlap around all the edges. This ensures you have plenty of material to work with.
2. Underlayment
This soft, protective fabric goes directly under your pond liner. It's like a soft cushion for your liner. It's super important because it helps to prevent sharp rocks, roots, or any small hidden debris in the soil from poking holes in your valuable liner. Using dedicated underlayment is always recommended for the best protection.
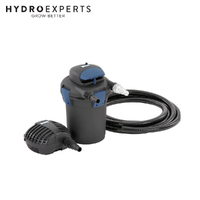
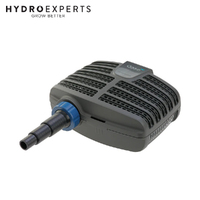
3. Pond Pump
Your pond pump is the engine of your pond's health. It's vital for moving and circulating the water, which keeps it fresh and helps prevent it from becoming stagnant.
- Sizing Your Pump: Pumps are measured by how much water they can move per hour (GPH - gallons per hour). You'll want a pump strong enough to circulate all the water in your pond at least once an hour. If you're adding a waterfall or a stream, you'll need an even more powerful pump to push the water uphill.
- Types: "Submersible pumps" sit hidden directly in your pond water. "External pumps" sit outside the pond and pull water in through a hose.
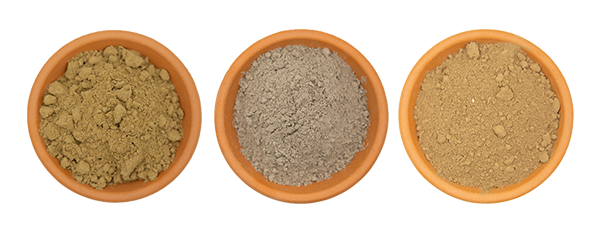
4. Pond Filtration System
A good filter is essential for keeping your pond water clear and healthy for any fish or plants you might have.
- Mechanical Filters: These work like a big sieve, physically catching and removing larger debris such as leaves, uneaten fish food, and fish waste from the water. A "skimmer" is often part of this system, specifically designed to pull floating debris from the surface.
- Biological Filters: These filters are filled with special materials that provide a perfect home for helpful bacteria. These "good" bacteria break down invisible harmful waste products in the water, making it safe for your pond's inhabitants.
- UV Clarifiers: These are optional but very effective tools for battling stubborn green pond water. A UV clarifier uses ultraviolet light to kill the tiny floating algae that make your water cloudy and green, making them clump together so your filter can easily catch them.
Tip: Depending on the type of fish and the load, you must use precise and properly measured supplies to maintain cleaner water. Here are some recommended filter systems:
In-Pond Filter Systems
| Fish Load | Filter | UVC | Pump | ||
|---|---|---|---|---|---|
| Natural | Fish | Koi | |||
| <1500L | <750L | - | Filtar UVC 1500 | 5w (integrated) | 750lph (included) |
| <3500L | <1500L | - | Filtar UVC 3000 | 9w (integrated) | 1500lph (included) |
| <1500L | <3000L | - | Filtar UVC 6000 | 11w (integrated) | 2500lph (included) |
Pressurised Filter Systems
| Fish Load | Filter | UVC | Pump | Bundle Discount | ||
|---|---|---|---|---|---|---|
| Natural | Fish | Koi | ||||
| <1500L | <750L | - | Filtar UVC 1500 | 5w (integrated) | 750lph (included) | - |
| <3500L | <1500L | - | Filtar UVC 3000 | 9w (integrated) | 1500lph (included) | - |
| <1500L | <3000L | - | Filtar UVC 6000 | 11w (integrated) | 2500lph (included) | - |
| <4000L | <2500L | - | BioPress 4000 | 7w (integrated) | 1500lph (included) | - |
| <5000L | <2500L | - | FiltoClear 5000 | 18w (integrated) | AquaMax Eco Premium 5000 / AquaMax Eco Classic 5500 | Bundle it & Get 5% OFF (Automatically Applied on Checkout) |
| <6000L | <3000L | - | BioPress 6000 | 9w (integrated) | 2500lph (included) | - |
| <9000L | <4500L | - | BioPress 10000 | 11w (integrated) | 3500lph (included) | - |
| <13000L | <7000L | - | FiltoClear 13000 | 24w (integrated) | AquaMax Eco Premium 9000 / AquaMax Eco Classic 8500 | Bundle it & Get 5% OFF (Automatically Applied on Checkout) |
| <19000L | <10000L | <5000L | FiltoClear 19000 | 42w (integrated) | AquaMax Eco Premium 13000 / AquaMax Eco Classic 14500 | Bundle it & Get 5% OFF (Automatically Applied on Checkout) |
| <31000L | <6000L | <7500L | FiltoClear 31000 | 60w (integrated) | AquaMax Eco Premium 17000 / AquaMax Eco Classic 17500 | Bundle it & Get 5% OFF (Automatically Applied on Checkout) |
Flow-through Filter Systems
| Fish Load | Filter | UVC | Pump | Bundle Discount | ||
|---|---|---|---|---|---|---|
| Natural | Fish | Koi | ||||
| <18000L | <9000L | - | BioSmart 18000 | Vitronic 18w | AquaMax Eco Premium 5000 / Classic 5500 | Bundle it & Get 5% OFF (Automatically Applied on Checkout) |
| <36000L | <18000L | <9000L | BioSmart 36000 | Vitronic 36w | AquaMax Eco Premium 9000 / Classic 11500 | Bundle it & Get 5% OFF (Automatically Applied on Checkout) |
| <40000L | <20000L | <10000L | BioTec Screenmatic 40000 | Vitronic 36w | AquaMax Eco Premium 13000 | Bundle it & Get 5% OFF (Automatically Applied on Checkout) |
| <60000L | <30000L | <15000L | BioTec Screenmatic 60000 | Bitron C 55w | AquaMax Eco Premium 17000 | Bundle it & Get 5% OFF (Automatically Applied on Checkout) |
| <80000L | <40000L | <20000L | ProfiClear Premium Compact-M Pump Fed | Bitron C 110w / Bitron Eco 180w | AquaMax Eco Premium 13000 | Bundle it & Get 5% OFF (Automatically Applied on Checkout) |
| <90000L | <45000L | <22500L | BioTec Screenmatic 90000 | Bitron C 110w / Bitron Eco 180w | AquaMax Eco Premium 21000 | Bundle it & Get 5% OFF (Automatically Applied on Checkout) |
| <120000L | <60000L | <30000L | ProfiClear Premium Compact-L Pump Fed | Bitron Eco 180w / 240w | AquaMax Eco Premium 21000 / Expert 21000 | Bundle it & Get 5% OFF (Automatically Applied on Checkout) |
| <145000L | <72000L | <36000L | BioTec Screenmatic 145000 | Bitron Eco 180w / 240w | AquaMax Eco Premium 21000 / Expert 26000 | Bundle it & Get 5% OFF (Automatically Applied on Checkout) |
How to Build a Pond Step-by-Step
Building a pond is all about patience and demands many steps. So, to make it easy for you to build your pond properly, here is a step-by-step method you can try:
Step 1: Mark the Shape
Use a garden hose, rope, or even some spray paint to outline the shape of your pond on the ground. You can go with a natural shape like an oval or kidney bean, or something more formal like a circle or square.
Take your time with this step. Walk around the shape and make sure you're happy with how it looks in your garden before you start digging.
Step 2: Start Digging
Dig along the lines you marked. For small ponds, dig about 18-24 inches deep in the middle. You can also dig small ledges or "shelves" around the edges; these are great spots for placing plants later on. Remove any sharp stones, roots, or debris as you dig. The smoother the hole, the better your liner will sit.
Step 3: Add the Underlay
Once your hole is ready, lay down your underlay (like old carpet, blankets, or special pond fabric). This protects the liner from being torn or punctured by anything underneath. Make sure it covers the entire hole, including the sides and ledges.
Step 4: Place the Pond Liner
Now, place your pond liner over the hole. Gently press it into place, letting it sink into the shape. Don't worry if there are a few folds; just try to smooth them out as best as you can. Leave some extra liner (about 12 inches) around the edges. You'll trim it later, after the pond is filled.
Step 5: Fill with Water
Start filling your pond slowly using a garden hose. As the water rises, the liner will sink down more naturally into the shape. Keep adjusting the liner as it fills to avoid large wrinkles or air pockets. When it's full, let it sit for a bit to settle.
Step 6: Trim and Tidy the Edges
Once your pond is full and the liner is in place, trim off the extra liner, but leave a little bit so the edges stay secure. Use rocks, stones, or bricks to hold the liner down and give your pond a clean border. This also helps keep dirt and grass from falling into the water.
Step 7: Add Plants, Pump, or Fish (Optional)
If you want, you can now add aquatic plants, a small pump, or even a few fish. Start with plants first; they help balance the water and make the pond look more natural.
If you're adding fish, wait about a week after filling the pond so the water can settle and any chemicals (like chlorine) can fade.
Maintenance Tips for a Healthy Pond
Keeping your pond clean and healthy doesn't have to be hard. With a little regular care, your pond will stay beautiful all year round. Here are some easy tips to follow:
- Remove Leaves and Debris Regularly: Fallen leaves, twigs, and dead plants can build up in the water and cause bad smells or algae. Use a small net to scoop them out every few days, especially in autumn.
- Keep the Water Level Steady: Check the water level, especially during hot weather. Add fresh water if it gets too low. This helps keep fish and plants healthy.
- Clean the Pump and Filter (if used): If you have a pump or filter, clean it every few weeks to keep it working properly. Turn off the power first, remove debris, and rinse gently with clean water.
- Watch for Algae: Green water or slimy buildup means too much algae. You can control it by adding more plants, reducing sunlight with floating plants, or using natural algae treatments.
Conclusion
Building a DIY pond is a fun and rewarding project that can completely transform your outdoor space. With careful planning, the right supplies, and a little regular maintenance, you'll have a beautiful pond that you and your family can enjoy year-round.
Whether it's home to fish, plants, or just peaceful reflections, your pond will soon become a favourite feature of your backyard. So grab your shovel and start digging, it's time to bring your garden to life!
FAQs
To build a pond, start by choosing a sunny location and marking your desired shape. Dig the hole, add an underlay to protect the liner, then place the pond liner inside. Fill it with water, trim the liner edges, and finish with rocks or plants. Optional additions include pumps, filters, and fish.
You'll need a few basic items: a shovel, a pond liner, underlay, rocks or edging material, and access to water. Optional supplies include a pump, filter, aquatic plants, and fish. If you're on a budget, many materials can be reused or repurposed from around the home.
For a simple decorative pond, 12 to 18 inches deep is usually enough. If you plan to keep fish, especially in colder climates, aim for at least 18 to 24 inches deep so the water doesn't freeze completely in winter and stays cool in summer.
Begin by planning your pond's size, location, and purpose. Dig the pond, lay down underlay and liner, and fill it with water. Add edging stones and a few aquatic plants. If you want fish or a fountain, add them gradually once the pond is stable, usually after about a week.
A good pond has clean water, proper sunlight, and a balanced mix of plants and wildlife. It's well-lined, easy to maintain, and blends naturally into your garden. Good ponds are also safe for kids and pets and have steady water levels with minimal algae buildup.