

How to Seamlessly Join PVC & EPDM Pond Liners With Oase?
By Hydro Experts | 31 July 2025

Creating a beautiful and thriving pond in your backyard is a rewarding project. But what happens when your pond design requires you to work with different types of liner materials, like PVC and EPDM? Perhaps you're expanding an existing pond, making a repair, or integrating a pre-formed feature. The good news is, with the right products and techniques from Oase, you can achieve a strong, watertight, and lasting connection between these different materials.
In this guide, we'll walk you through the essential steps and Oase products needed to confidently join PVC and EPDM pond liners, ensuring your aquatic paradise remains leak-free for years to come.
Why Join PVC and EPDM Pond Liners?
You might wonder why someone would need to combine different pond liner materials. There are several practical reasons why you can join PVC and EPDM pond liners:
1 Expanding an Existing Pond
If you have an older pond with a PVC liner and you wish to make it larger, it's often more practical to extend it with new EPDM liner material. EPDM is known for its durability and flexibility, making it a popular choice for new sections. Joining the new EPDM to your existing PVC allows for seamless growth without starting from scratch.
2 Repairing Large Liner Sections
Sometimes, a large tear or damage occurs in one type of liner, but you have a spare piece of the other material available. Instead of buying a whole new roll, you can use the available material as a patch. Knowing how to join PVC and EPDM ensures you can make effective, long-lasting repairs.
3 Integrating Pre-formed Features
Many pond designs incorporate pre-formed elements like waterfalls, stream beds, or filtration sumps. These are often made from rigid PVC. If your main pond body uses a flexible EPDM liner, you'll need a reliable way to connect the two materials for a watertight seal, ensuring water flows correctly without leaks.
4 Cost-Effectiveness and Material Availability
In some cases, you might have access to different liner materials at varying costs, or one type might be more readily available than the other. Being able to join PVC and EPDM gives you flexibility in sourcing materials, potentially saving you money or time on your pond project. It allows you to use what you have efficiently.
5 Custom Pond Shapes and Designs
For unique or complex pond shapes, it can sometimes be easier to use different liner materials for specific sections. For instance, a very deep section might use EPDM for its superior puncture resistance, while a shallower, more intricate area might use PVC for easier shaping. Joining them correctly is crucial for these custom designs.
Material Required to Join PVC Pond Liners
When you need to join two pieces of PVC pond liner together, Oase provides specific products designed for a strong, lasting bond. Here's what you'll need:
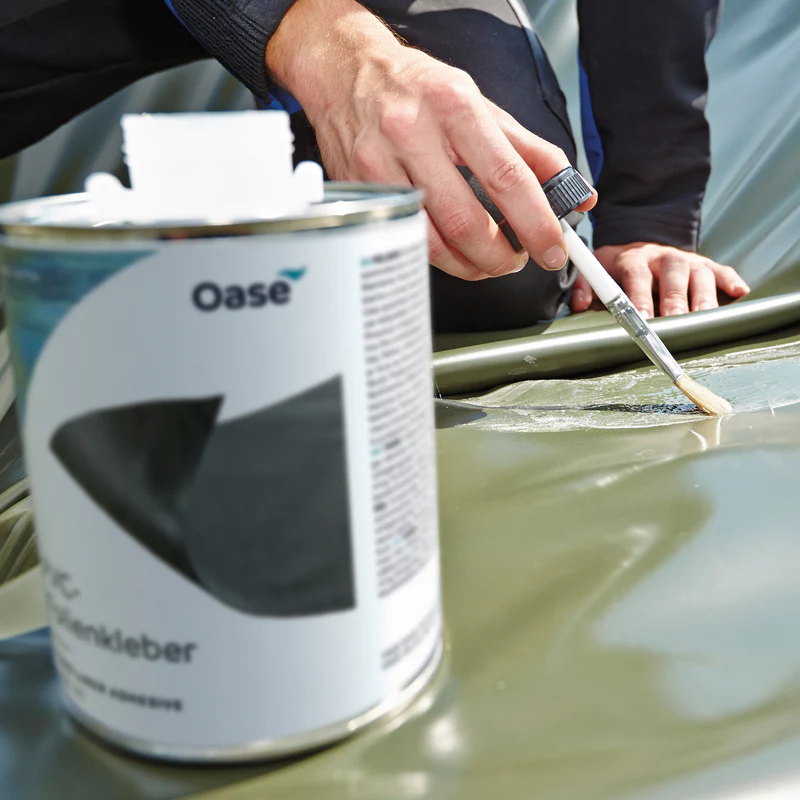
- OASE PVC Liner Adhesive 250ml: This is the primary bonding agent for PVC liners. OASE PVC Liner Adhesive 250ml is formulated to create a flexible yet incredibly strong and watertight seal between two PVC surfaces.
- Seam Roller: A hand roller is crucial for applying firm, even pressure to the seam. This helps to eliminate air bubbles and ensures maximum contact and adhesion between the liner and the adhesive.
- Clean Cloths: You'll need several clean, lint-free cloths for applying the cleaner and ensuring the surfaces are dry.
- Gloves: To protect your hands from the cleaner and adhesive.
Step-by-Step Guide to Join PVC Pond Liners
Joining PVC pond liners effectively requires careful preparation and precise application. Follow these steps to create a durable, watertight seam using Oase products:
Step 1: Prepare Your Work Area and Liners
First, lay out your PVC pond liners, overlapping them by at least 6 to 12 inches. This overlap provides ample surface area for a strong bond. Ensure the area where you'll be joining the liners is flat, smooth, and free from any wrinkles or folds that could compromise the seal.
Once the liners are in place, use a marker or chalk to draw a clear line along the edge of the top liner onto the bottom liner. This line will serve as your guide for applying the adhesive, ensuring a straight and consistent seam. Make sure both surfaces are dry before proceeding.
Step 2: Clean the Liner Surfaces Thoroughly
This is perhaps the most critical step for a successful bond. Apply Oase AquaActiv Pond Liner Cleaner generously to both PVC surfaces that will be joined. Use a clean, lint-free cloth to scrub the areas. You'll often see dirt and grime lift away, even from seemingly clean liners.
After scrubbing, use a fresh, clean cloth to wipe away any excess cleaner and dissolved residues. It is absolutely vital that the cleaned surfaces are allowed to dry completely before moving on. Any moisture or leftover cleaner will weaken the adhesive bond, so be patient and ensure it's bone dry.
Step 3: Apply Oase AquaActiv PVC Liner Adhesive
Once the surfaces are perfectly clean and dry, it's time to apply the Oase AquaActiv PVC Liner Adhesive. Apply an even, continuous bead or spread of adhesive to one of the cleaned PVC surfaces. Make sure the adhesive covers the entire width of the intended seam.
Carefully and smoothly, lay the second PVC liner piece over the adhesive, aligning it precisely with the marked line you drew earlier. Work quickly but deliberately to avoid trapping air bubbles.
Step 4: Secure the Seam with a Roller
Immediately after laying the top liner onto the adhesive, use your Seam Roller. Starting from the centre of the seam and working outwards, apply firm, consistent pressure along the entire length of the joint. This action pushes out any trapped air bubbles and ensures maximum contact between the adhesive and both liner surfaces.
Continue rolling until you see a slight squeeze-out of adhesive along the edges of the seam, indicating a good bond. This step is crucial for achieving a strong, watertight seal that will stand the test of time.
Step 5: Allow for Proper Curing Time
After rolling the seam, it's essential to allow the Oase AquaActiv PVC Liner Adhesive sufficient time to cure. Refer to the product instructions for the exact curing time, but typically, this can range from 24 to 48 hours. During this period, avoid putting any stress or weight on the newly formed seam.
Do not introduce water into the pond or walk on the seam until the adhesive has fully cured. Rushing this step can compromise the bond and lead to leaks down the line. Patience here pays off in a durable, leak-free pond.
Tips For Successful Joining PVC Pond Liners
Achieving a perfect PVC pond liner joint is all about attention to detail. Keep these tips in mind for the best results:
- Work in Dry Conditions: Always perform liner joining on a dry day with no rain in the forecast. Moisture is the enemy of a strong adhesive bond.
- Temperature Matters: Check the Oase adhesive's product label for ideal application temperatures. Extreme cold or heat can affect the adhesive's performance and curing.
- Cleanliness is Paramount: Any dust, dirt, oils, or debris on the liner surfaces will prevent the adhesive from bonding properly. Take your time with the cleaning step.
- Overlap Generously: A larger overlap (e.g., 12 inches) provides more surface area for the bond, making the seam stronger and more forgiving.
- Patience is a Virtue: Do not rush the cleaning, adhesive application, or especially the curing process. A hurried job often leads to leaks.
Material Required to Join EPDM Pond Liners
EPDM pond liners are known for their exceptional durability and flexibility. Joining two pieces of EPDM requires specialised Oase products designed to work with this unique material:
- Pond Liner Cleaner: Just like with PVC, a clean surface is paramount for EPDM. This cleaner prepares the EPDM for optimal adhesion by removing contaminants.
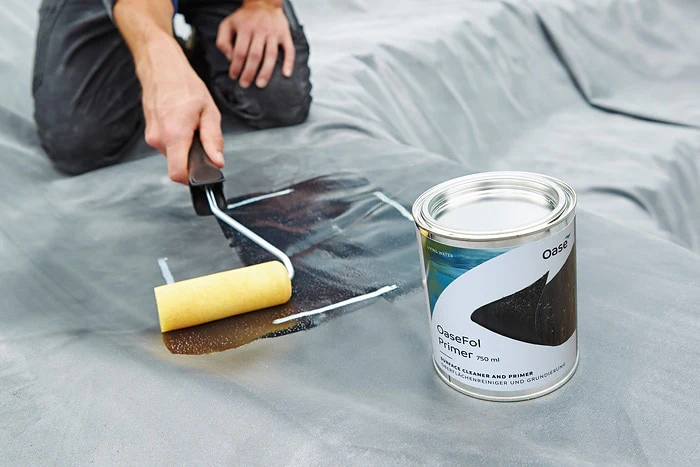
- OaseFol Primer: OaseFol Primer is used to prepare the surface of the OaseFol EPDM liner for further processing with OaseFol SeamTape.
- Seam Tape (or similar EPDM Seam Tape): While adhesive is used, EPDM seams often benefit greatly from specialised seam tape applied over the adhesive for added strength and a completely watertight seal. This tape is designed to bond directly to EPDM.
- Pond Liner Seam Roller: Essential for applying firm, even pressure to the seam, ensuring the adhesive and tape bond fully and eliminating air pockets.
- Clean Cloths: For cleaning the liner surfaces.
- Gloves: For protection during the application process.
Step-by-Step Guide to Join EPDM Pond Liners
Joining EPDM pond liners is a straightforward process with the right Oase products. Follow these steps for a long-lasting, watertight connection:
Step 1: Prepare Your Liners and Overlap Correctly
Begin by laying out your EPDM pond liners, ensuring they overlap by at least 6 to 12 inches. This generous overlap is crucial for creating a robust and secure seam. Make sure the area where the two liners meet is smooth, flat, and free of any folds or creases that could prevent a perfect seal.
Once the liners are positioned, use a non-permanent marker or chalk to draw a clear guideline on the bottom liner, following the edge of the top liner. This line will help you accurately apply the adhesive and tape, ensuring your seam is straight and consistent. Confirm both surfaces are completely dry before proceeding.
Step 2: Thoroughly Clean the EPDM Surfaces
Cleaning is a non-negotiable step for any successful liner join. Apply Oase AquaActiv Pond Liner Cleaner to both EPDM surfaces that will be part of the seam. Using a clean, lint-free cloth, vigorously scrub these areas to remove all dirt, dust, oils, and any other contaminants. EPDM can sometimes have a powdery residue from manufacturing, which must be removed.
After scrubbing, use a fresh, clean cloth to wipe away any cleaner residue. It is absolutely essential that the cleaned EPDM surfaces are allowed to dry completely before you apply any adhesive or tape. Any moisture will compromise the bond, so be patient and ensure the areas are bone dry to the touch.
Step 3: Apply Oase AquaActiv EPDM Liner Adhesive
With your EPDM surfaces clean and dry, it's time to apply the Oase AquaActiv EPDM Liner Adhesive. Apply an even, consistent layer of adhesive to one of the EPDM surfaces within the overlap area. Ensure the adhesive covers the entire width of the seam.
Carefully and smoothly, lay the second EPDM liner piece over the adhesive, aligning it precisely with the guideline you marked earlier. Work methodically to avoid trapping any air bubbles underneath the top liner.
Step 4: Apply Oase QuickSeam Tape and Roll
Immediately after laying the top liner onto the adhesive, apply the Oase QuickSeam Tape (or similar EPDM seam tape) directly over the newly formed seam. Position the tape centrally over the joint, ensuring it adheres to both liner pieces. Press it down firmly by hand initially.
Then, use your Oase Pond Liner Seam Roller. Starting from the centre of the seam and rolling outwards, apply firm, consistent pressure along the entire length of the tape. This action is vital for activating the adhesive on the tape and ensuring maximum contact, eliminating air pockets, and creating a strong, watertight bond.
Step 5: Allow for Proper Curing Time
Once the EPDM seam is completed with both adhesive and tape, it's crucial to allow adequate time for the products to cure. Always refer to the specific Oase product instructions for the recommended curing period, which is typically 24 to 48 hours. During this time, the adhesive and tape will fully bond and reach their maximum strength.
Avoid placing any stress, weight, or water on the newly joined seam until the curing process is complete. Rushing this step can lead to a weakened bond and potential leaks, jeopardizing your pond's integrity. Patience ensures a durable and long-lasting result.
Tips For Successful Joining EPDM Pond Liners
Creating a strong EPDM pond liner joint is straightforward with the right approach. Here are some key tips to help you succeed:
- Optimal Weather Conditions: Always work on a dry day with mild temperatures. Avoid extreme heat, cold, or windy conditions, which can affect adhesive performance and introduce debris.
- Thorough Cleaning is Non-Negotiable: EPDM liners can have a release agent or dust from manufacturing. Ensure the cleaning step is meticulous; a truly clean surface is the foundation of a strong bond.
- Generous Overlap: Provide at least a 6-12 inch overlap. This gives you ample room to work and ensures a robust bonding area for the adhesive and seam tape.
- Use a Seam Roller: Don't skip the seam roller! It's essential to apply the necessary pressure to activate the adhesive and tape, expelling air, and ensuring full contact.
- Patience with Curing: Allow the recommended curing time. The bond strengthens as it cures, and disturbing it too early can lead to a compromised seal.
Conclusion
Successfully joining PVC and EPDM pond liners is a crucial skill for any pond enthusiast, whether you're expanding, repairing, or building a custom design. By choosing the right Oase products and diligently following the step-by-step guides for each material, you can create strong, lasting, and watertight seams. Remember, preparation, cleanliness, and patience are your best tools for a leak-free pond.
With Oase's reliable solutions, you can confidently tackle your pond projects, ensuring your aquatic habitat remains beautiful and healthy for years to come. So, if you are looking to get all your products in one stop, Hydro Experts is your go-to.
Shop Pond Liner Joining Products at Hydro ExpertsFAQs
No, it's highly recommended to use adhesives specifically formulated for each material. PVC and EPDM have different chemical properties, and Oase provides specialized adhesives (like Oase AquaActiv PVC Liner Adhesive and Oase AquaActiv EPDM Liner Adhesive) designed to create the strongest bond for each type.
With proper cleaning, application, and curing using Oase products, a well-made seam can last for many years, often as long as the pond liner itself. Regular inspection and protection from UV exposure will help maximize its lifespan.
If the adhesive is still wet, you might be able to wipe it away with a clean cloth carefully. Once cured, it's very difficult to remove without damaging the liner. Prevention is key: work carefully and protect surrounding areas.
Yes, but only if you use the right adhesive and follow proper preparation steps. Oase products are made for this exact purpose.
Not always, but using a primer improves the bond, especially with older or textured EPDM surfaces.