

How High Should You Hang Your Grow Light for Each Growth Stage
By Hydro Experts | 24 July 2026
For standard LED grow lights, start higher during seedlings, around 18-24 inches during vegetative growth & around 12-18 inches during flowering. Always follow the manufacturer's recommendations, adjust based on plant response & actual light intensity.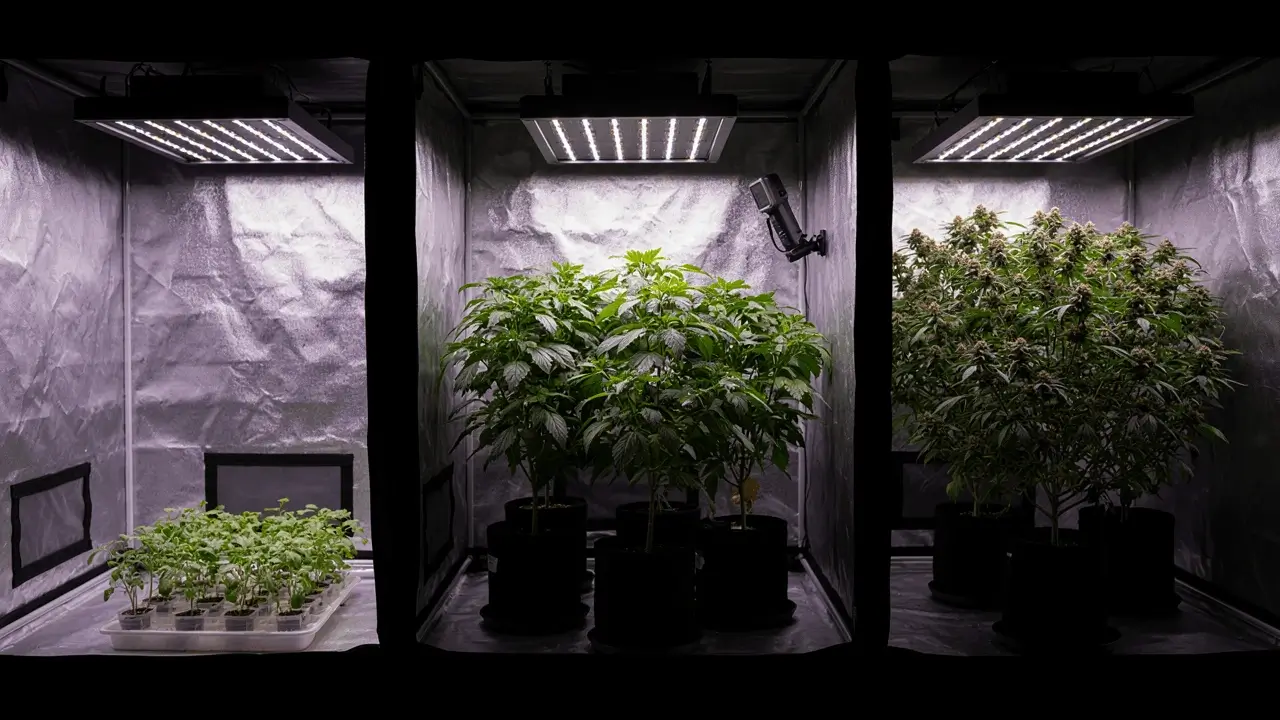
Hang your grow light too close, and you risk light bleaching, heat stress, and burnt leaf tips. Hang it too far away, and your plants stretch, struggling to reach enough light to grow properly. Getting the distance right at each stage of growth is one of the simplest adjustments you can make, and it has a bigger impact on yield than most growers expect.
This guide breaks down how high to hang your grow light during the seedling, vegetative, and flowering stages, and why that distance needs to change as your plants develop.
Quick Summary: How High Should You Hang Your Grow Light?
- Start higher for seedlings and clones: Young plants need gentler light, so keep the fixture higher and/or dimmer while watching for stretching as a sign they need more light.
- Lower the light during vegetative growth: Most standard LED grow lights can be positioned around 18–24 inches above the canopy, while gradually increasing intensity as plants become established.
- Move closer during flowering: Many standard LED fixtures work around 12–18 inches above the canopy, but high-output lights may need greater clearance.
- Adjust for your specific light and canopy: Hanging height depends on fixture wattage, coverage, plant tolerance, and canopy height. Recheck the distance regularly as plants grow.
- Watch for signs of too much or too little light: Stretching can indicate insufficient intensity, while bleaching, curling, yellowing, or crispy leaf tips can indicate excessive light or heat stress.
- Use PPFD when precision matters: Height guidelines are useful starting points, but a PAR/PPFD meter provides a more accurate measure of the light reaching your canopy.
Quick answer: For many standard LED grow lights, start higher during seedlings, around 18–24 inches during vegetative growth, and around 12–18 inches during flowering. Always follow the manufacturer's recommendations and adjust based on plant response and actual light intensity.
Why Hanging Height Actually Matters
Light intensity drops off sharply the further your plants sit from the light source, which is why a fixed hanging height rarely works throughout an entire grow cycle. The relationship between distance and intensity is not linear, even a small shift in height can produce a significant change in the light reaching the canopy, particularly at closer distances where the drop-off is steepest.
Young Plants Need Gentler Light
Seedlings and clones have limited root systems and have not yet built up tolerance to intense light. Exposing young plants to too much intensity too soon stresses or damages them before they have the structural foundation to cope. At this stage the goal is building strong roots and healthy early growth, not pushing rapid development and the light distance should reflect that by keeping intensity well within what young tissue can handle comfortably.
Mature Plants Can Handle and Need More Intensity
As plants move into vegetative growth and especially flowering, they can use significantly more light to fuel faster growth and denser bud or fruit development. A light level that would damage a seedling is exactly what a well-established flowering plant needs to reach its potential. Keeping the light at seedling-stage distance throughout the grow means leaving yield on the table at every subsequent stage.
Canopy Height Changes Throughout the Grow
As plants grow taller, the actual distance between the light and the top of the canopy shrinks even if the light itself has not moved. A height that was appropriate at the start of the vegetative stage may already be too close several weeks later once the canopy has risen. This is why hanging height needs regular rechecking across the full grow cycle, not just a one-time setup at the beginning of each stage.
| Growth Stage | Typical Height Range (LED) | Key Signal to Watch | Common Mistake |
|---|---|---|---|
| Seedling / Clone | Furthest from canopy, higher and dimmer than any other stage | Stretching toward the light means it needs to come slightly closer or brighter | Assuming more light is always better for young plants |
| Vegetative | Around 18–24 inches for most standard LED fixtures | Leaves reaching upward indicates correct distance; curling or bleaching means too close | Setting height once and not adjusting as the canopy rises |
| Flowering | Around 12–18 inches for many standard fixtures; more for high-output lights | Bleached, yellowing, or crispy leaf tips near the canopy top indicate too close | Pushing high-output lights too close in an effort to maximise intensity |
Seedling and Clone Stage: Keep It Gentle
Young plants and freshly rooted clones need light, but not a lot of it. This stage is about building strong roots and healthy early structure before ramping up to the intensities later stages demand. Overexposure at this point sets plants back rather than pushing them forward.
What to Look For at This Stage
Hang the light higher and dimmer than you would for any later stage, keeping intensity well below what established plants can tolerate. Stretching, where seedlings grow tall and thin, reaching upward, is the primary signal that the light is too far away or too dim, not too close. Conversely, if very young seedlings show pale, washed-out colouring or seem to be recoiling from the light, bring it back up or reduce output. Use a dedicated propagation light where possible, since purpose-built propagation bars output gentler, more appropriate intensity for this early stage without requiring guesswork about height and dimming settings on a full-size fixture.
This is the stage where it is easy to assume more light is always better, but young plants genuinely perform better with a gentler introduction. Building light tolerance gradually from the seedling stage produces stronger, more resilient plants throughout the rest of the grow.
Vegetative Stage: Build a Strong, Bushy Structure
Once plants have established a solid root system and moved into active vegetative growth, they can handle noticeably more light. This is the stage where you want to encourage strong, bushy canopy structure rather than the tall, thin growth that results from insufficient light at this phase.
Dialling In Vegetative Distance
Bring the light closer than the seedling stage, typically somewhere in the range of 18 to 24 inches above the canopy for most standard LED fixtures, though this varies by wattage and specific light model. Increase intensity gradually rather than all at once, giving plants time to adjust as they move deeper into vegetative growth. Leaves reaching upward toward the light generally indicate the distance is about right, while leaves curling downward or showing bleached, pale patches suggest the light is sitting too close. Vegetative growth can be rapid, so recheck the actual distance between the light and the canopy regularly. The height that was correct at the start of the vegetative stage may already be too close several weeks in.
Flowering Stage: Maximum Intensity, Careful Monitoring
Flowering is when plants can generally handle, and actively benefit from, the most intense light of the entire grow cycle. This stage drives the bulk of bud or fruit development, and light intensity is one of the primary inputs determining how dense and productive that development is. It is also the stage most prone to light stress if intensity is pushed beyond what the canopy can manage.
Getting Flowering Distance Right
Bring the light closer still, often somewhere between 12 and 18 inches above the canopy for many standard fixtures, though higher-output lights may need considerably more clearance even at this stage simply because of the total intensity they put out at close range. Bleached, yellowing, or crispy leaf tips near the top of the canopy are the clearest signal that the light is sitting too close for the plant's current tolerance. Refer to your specific light's manufacturer guidance where available, since recommended hanging height ranges account for the actual output of the fixture rather than applying a generic rule across very different lights. A mid-range quantum board covering a 2x2 foot area will need meaningfully less clearance than a larger, higher-output fixture covering a 4x4 foot area, even at the same stage of growth.
Higher wattage lights need more clearance. A high-output fixture covering a large canopy area often needs to sit further away than a smaller light would, even during flowering, because it is delivering more total intensity at any given distance. Do not assume that getting the light as close as possible always produces the best result.
Practical Tips for Getting Hanging Height Right
Use an Adjustable Hanging System
Rope ratchets or similar adjustable light hangers, which come included with most quality LED fixtures, make it far easier to raise or lower your light as plants grow, rather than needing to reposition fixed hooks each time the canopy rises. This small convenience makes it significantly more likely that adjustments actually get made on the regular schedule they require.
Check Your Canopy Weekly
Growth rates vary across strains and conditions, and a light height that was correct two weeks ago may already be too close if plants have grown faster than expected. Building a weekly canopy height check into your routine, particularly during the rapid growth of the vegetative stage, prevents the gradual creep of the canopy toward the light going unnoticed until stress symptoms appear.
Use a PAR or PPFD Meter for Precision
General height guidelines are a solid starting point, but an actual light meter reading gives a far more accurate picture of what plants are receiving at canopy level. Different fixtures distribute light differently, and the same hanging height can produce very different PPFD readings depending on reflectivity, tent size, and fixture design. For growers serious about dialling in their setup, measuring actual intensity at the canopy is significantly more informative than relying on distance alone.
Watch Your Plants, Not Just a Ruler
The signs of light stress, stretching, bleaching, curling, are more reliable indicators than any fixed number, since every light and every grow space behaves slightly differently. Distance guidelines give a starting point; plant response confirms whether that starting point is working. If heat stress symptoms appear even within the recommended range, increase distance temporarily, since ambient temperature in the grow space also affects how much thermal load plants deal with at any given light height.
Find the Right Grow Light at Hydro Experts
Not sure which grow light fits your space and growth stage? Browse the full range of LED grow lights at Hydro Experts, including quantum boards, bar-style fixtures, and purpose-built propagation lights for the seedling stage. Reach out to the team for help finding the right fixture and setup for your plants, space, and budget.
FAQs
Higher than any other stage, keeping light intensity gentle while young plants establish their root systems. The exact distance depends on your specific fixture's output, but the goal is to provide enough light to prevent stretching without exposing young, sensitive tissue to intensity it cannot yet handle. Stretching, tall, thin growth reaching toward the light, is the main sign the light needs to come down slightly or intensity needs to increase a little. A purpose-built propagation light removes much of the guesswork at this stage.
Generally around 18 to 24 inches above the canopy for most standard LED fixtures, though this varies by wattage and light model. Leaves reaching upward toward the light is a good sign the distance and intensity are appropriate. Leaves curling downward, bleached patches, or pale colouring near the top of the canopy suggests the light is sitting too close. Check canopy height regularly during this stage, since vegetative growth can be rapid and the effective distance shrinks as plants grow taller.
Often between 12 and 18 inches for many standard fixtures, though higher-output lights may need considerably more clearance even during this stage because of the total intensity they deliver at close range. Watch for bleaching, yellowing, or crispy leaf tips near the top of the canopy as the clearest sign the light is too close. Refer to your specific fixture's manufacturer guidance where available, since recommended ranges are based on actual output rather than a one-size-fits-all distance.
Yes, particularly during vegetative growth when plants can grow quickly. The canopy rises toward the light even when the light itself has not moved, so the effective distance shrinks continuously through an active growth phase. Checking canopy height weekly, and adjusting the light upward as needed, keeps the actual distance within the target range rather than letting the canopy gradually encroach without any correction. Setting height once at the start of a stage and not revisiting it is one of the most common causes of light stress later in that same stage.
General guidelines are a solid starting point and work well for most growers getting set up. A PAR or PPFD meter gives a much more accurate picture of actual light intensity at canopy level, which matters increasingly as you get more serious about optimising yield. Different fixtures distribute light differently, reflectivity and tent size affect readings, and the same hanging height can produce noticeably different results across different setups. For growers who want to dial in their environment precisely rather than working from approximations, measuring actual canopy intensity is a meaningful step up from distance-based guidelines alone.